I’m one of those people who raves about Scrivener.
(Affiliate Link: Mac | Windows)
I have used it for writing my dissertation (my drafts, notes and research are all organised into one huge file — that file is just getting totally nuts, by the way). I have also used it for organising other, unrelated research, for general note-taking and outlining, for compiling books for Kindle, and a bunch of other things. Oh, and sometimes I use it to write stuff.
Today, I want to show you how you can use Scrivener to structure your non-fiction book… and do it in a way that your new template FORCES you to write better books.
The end result we are aiming for is a Scrivener non-fiction book template that is always there, ready for you to fill in. Once you have a template in front of you, filled with prompts, reminders, and notes about what you need to do with each part of the book, it will be much easier to go from generic skeleton to specific, meaty outline. If you do it right, the template will force you to create an awesome outline that results in an awesome book.
At the end of the day, we just want something like this:
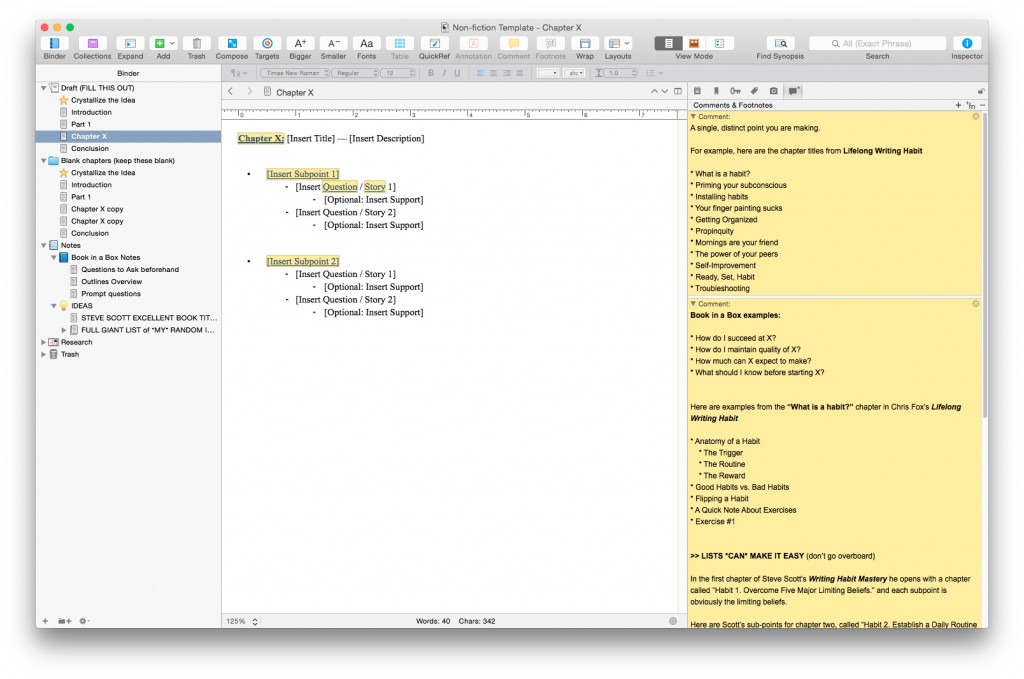
In the far left column (or binder), you see the Draft outline at the top, ready to be filled in. The chapters need to be duplicated or copied and pasted as you determine you need more, but that's why there's an entire folder immediately below the Draft folder containing blank chapter files. You can also see in this column that I also have a section called “Crystallise Your Idea.” I'll talk a bit more about this below; basically, it is filled with items/questions for me to complete before I begin the actual structure. This helps give my ideas focus before I begin the actual outline. At the very very bottom, I have more detailed notes on structure, as well as an ideas folder filled with both examples and my own, actual ideas. These exist mostly for reference.
In the big middle column (or main editor), you see the bare bones of “a” chapter. You can see how it is so generic it could develop into a chapter on any topic. What's more important, though, are the comments for each individual aspect of the chapter, there to remind me what I need to do with each element of that chapter.
All the comments you see in the right yellow column are my own notes from The Book in a Box Method, sometimes combined with quotes directly from the book. With the comments right there, you will always know what each aspect of each part of your structure has to do. I also added examples of each part of the structure, so I always had them there as reference.
I included examples from The Book In a Box Method, but you can see I also mention Chris Fox's Lifelong Writing Habit and Steve Scott's Writing Habit Mastery, using their chapters and sub-points as just more examples for later reference. The examples are included just to get my brain going. Ideas beget ideas.
You could actually take this a step further, and color code your comments. (You can just right click on a comment and change its color.) So you might have normal notes be yellow, but then have comments that are only examples, and they're in blue or something. I don't know. It's up to you.
So, here's how to create a personalised Scrivener template that will work for you, and force you to write better books.
Step 1. Read a Book on Structure, and Take Notes
First, you have to know what kind of structure you want to use, and you have to know what you want each element in the structure to do.
.COM | .CA | .CO.UK
In this post, I'm going to use The Book in a Box Method, since the guys who wrote it know both how to write a book and sell it. I'll show some of my notes in the Scrivener screenshots, but if you like what you see, go buy the book. It's like $3 on Kindle, and my notes mine. I don't mean I have proprietary rights over them or anything; I just mean they're relevant to me. Your notes will be relevant to you. What resonated with me won't necessarily resonate with you. Capiche?
The Book in a Box Method emphasises writing a successful book means not just writing out your brilliant glorious idea, but writing to a market. Writers can be pretty egotistic, but writing isn't about “the author,” and how glorious and great he/she is, or how glorious and great his/her ideas are; writing is about the experience of reading, the thing that happens in the reader's head, and what they take away from it.
This means that you need to write to the market, based on their needs. It's not about “you,” especially at this stage, so your outline template should reflect this, and force you to approach your structure in this way.
The first step is usually to figure out exactly who your market is; so that from there you figure out what their needs are, and from there you can brainstorm awesome ideas to totally and completely meet those needs better than anyone else on the planet. If you brainstorm ideas to meet a non-existent need, then you'll end up with a bad book. Having a beginner section that forces you to consider your market prevents this from happening.
Now, The Book in a Box Method goes even a step further than this. The authors point out that different books can have different goals. An author might want to use the book for lead generation, or the book might be used to establish the author's authority as a thought leader in their field. Or maybe the author just wants to manufacture a best-seller and see their name on the best-seller lists. All those goals are fine, but for each of them, you will be writing to a different audience with different needs.
The Book in a Box Method is also useful here because it's designed for people who almost don't want to write the book. It's for people who just want to have a book written. A large part of the “method” involves asking the actual “author” questions based on the outline, and recording the conversation over Skype or something, then using that recorded conversation as a basis for the text. (You can also have the conversation transcribed before doing so.) In some ways, the book is less about how to write a non-fiction book than it is how to take the basic techniques of ghostwriting a non-fiction book and using them, even if you're working alone.
I think this is actually a very useful way of approaching structure because it forces you to ask yourself the exact kinds of questions you need to in order to get the best possible book. The Book In a Box Method focuses on doing the kind of digging and questioning it takes to simplify complex ideas, and to then get stories and illustrative examples that 1) make those ideas even clearer, and 2) make the book much more interesting. I've worked with authors who have great ideas, but they don't use enough stories. The result, if you don't dig and force them to give you those stories, is a very dry book.
This is why the first step is to take notes on a book on structure, so that while you have certain ideas fresh in your mind, you can have notes on them there as a reminder for you, when it actually comes time to create your book/outline. As you learn more about nonfiction books, and/or you form your own opinions about structure, you can just add to your template, so you have more and more reminders and ideas there for you to get your brain going.
As long as you plop your notes into your Scrivener template, your notes will be saved in the best possible place. I'm suggesting you start by reading and taking notes on just one book, because later on, you can simply adjust your template as you read more and take more notes, and think of more things that each part of the structure can accomplish. You will also come across examples that you want to shove into your template.
I'm suggesting you start by reading and taking notes on just one book, because later on, you will simply adjust your template as you read more, and as you take more notes. You will think of more things that each part of the structure can or should accomplish. You will also come across great examples from other books that you will want to shove into your template.
For example, I read a blog post (or a podcast maybe?) about Tim Ferriss' The 4-Hour Body and the way it was built. Each chapter was designed to work on its own as a blog post title, so that if you looked at the table of contents, every single one of those titles would make you say, “Whoaa, I want to read that.” Partly, this helped sell the book, just because the Table of Contents then became a major part of the marketing. Partly, it made the book just plain better. And partly, it allowed Tim to “give away” those chapters as actual blog posts in the promotion of the book.
There's something to learn from this.
If you have a pre-existing template, you can simply add a comment to wherever your list of chapter titles is. Make the note say “Even individual chapter titles should inspire readers to say ‘I gotta read that!'” You could then include a few actual examples from the 4-Hour Body, or just examples of actual blog post titles that made you say, “I gotta read that,” or that bloggers have admitted are their most successful posts.
The first set of notes I took was actually just of what a structure looks like in a very, very general form.
This is the top-level, bird's-eye view of a structure:
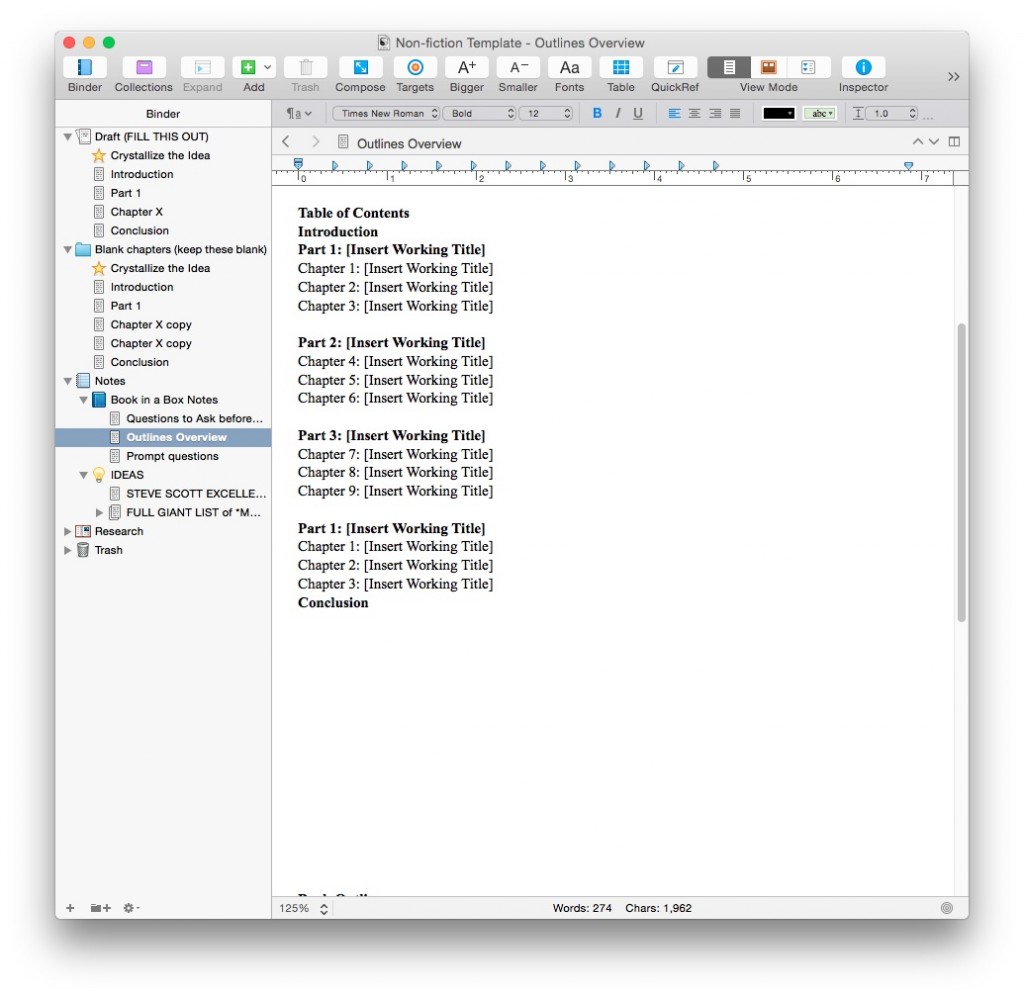
By itself, this isn't even *that* useful, obviously. But keep going, take more notes on things you find useful. You'll find a place for a lot of it when you start converting those notes to a real structure.
Just get the ideas there. On paper (or screen).
Whatever resonates, get it onto the screen.
Here are some of my notes on questions to ask beforehand, some of which ended up eventually in that preliminary “Crystallize the Idea” section that's all about understanding your market:
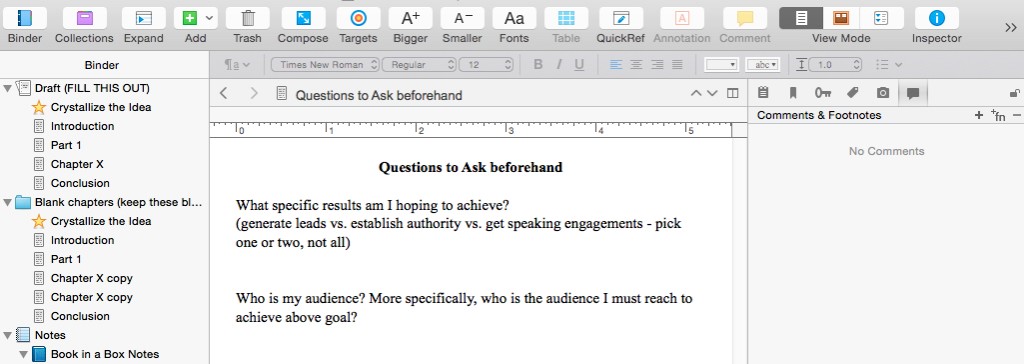
Just get it all there on paper. All the great ideas for how to improve a non-fiction book, write it down.
Then move on to Step 2.
Step 2.Turn the more detailed notes into an outline
From here, we can add notes and comments about what each section is supposed to accomplish, then move that up and turn it into an actual outline in the Scrivener file.
Compare the following screenshot to the one above, with just the barebones notes on an outline:
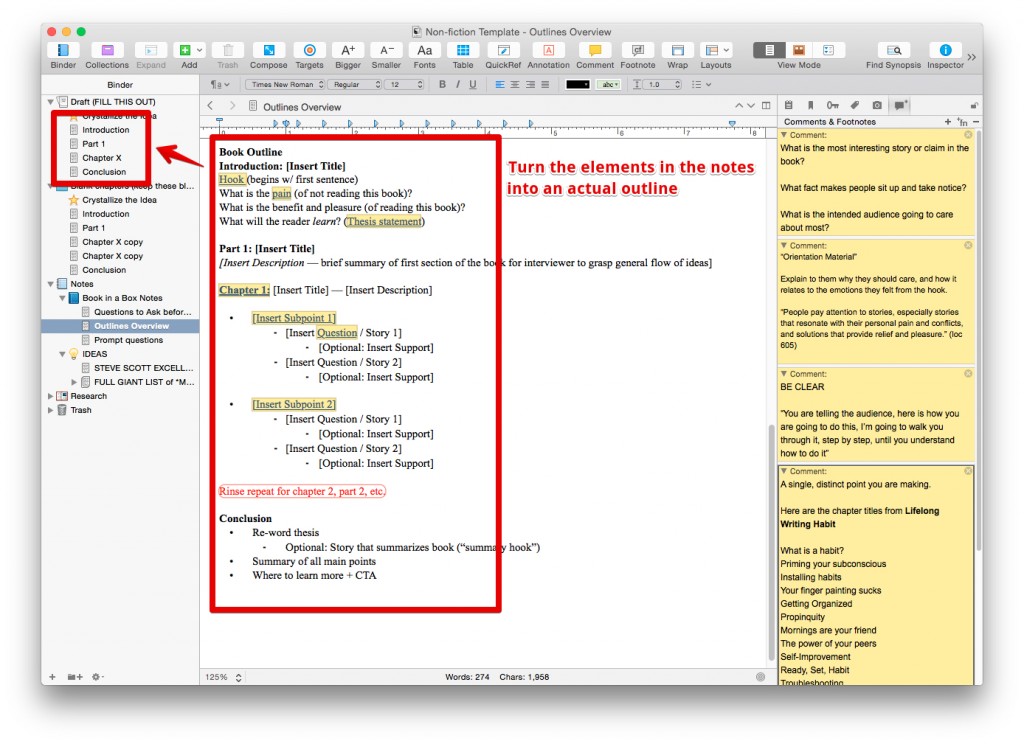
All I did was keep adding comments and expanding that short, very basic skeleton outline. I added notes and comments to the various elements, then used the expanded notes to create an actual outline in the binder.
The key idea is that all the more detailed notes (e.g., like those “questions to ask beforehand”) should either be in comments, or in some preliminary stuff that comes before the draft. You want these things there for reference, but not in a way that will interfere with writing or drafting out a specific non-fiction book.
I like to give the preliminary stuff a different icon (in this case, I used star). This is so that when you have the final outline, you can refer to them easily in the right spots, but they don't interfere with the writing.
There is no single, right way to do this. It's a personal template. Yes, it takes some creativity, but that's what makes it useful. Welcome to writing. As long as you get the notes in some way “attached” to the relevant bits of the outline (as you can see with my comments), you'll be fine.
You can also see that in the left column I only have one chapter in there, and I called it “Chapter X.” This is because the general notes for each chapter are the same. There's no use creating a bunch of duplicates until you need them.
There are two folders in the left column, each with an outline.
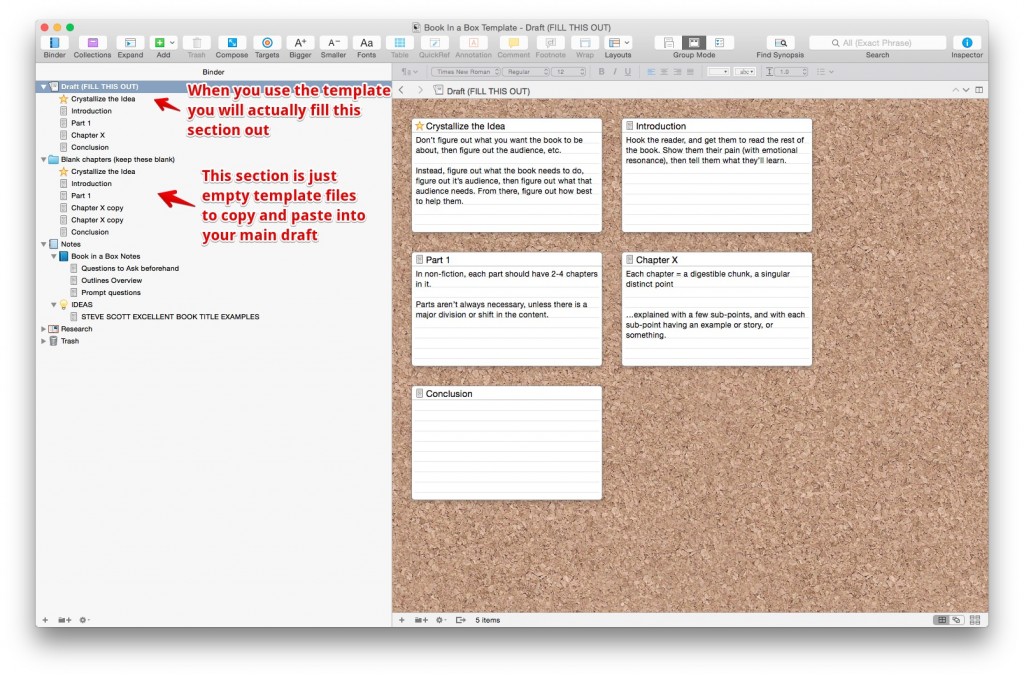
- The top folder is the draft. When you begin writing an actual book, you just open this up and start writing. Your notes are there.
- The folder below that *starts* the same as the top one, but it should remain blank except for the notes on structure. You just copy and paste the blank template files from here into your main draft, on an as needed basis.
Step 3. Save to template
Before you begin writing, you can save the blank outline you've created as a template, so it works as a generic template for all your books going forward. Pretty much all you need to do for this is select File > Save As Template instead of the regular save function.
Keep in mind that when you save a project as a template, Scrivener saves everything, including the notes, the comments, the structure — everything. So you want to save it as a template when you have nothing but the notes and structure, before you begin and kind of draft.
Step 4. Use the template
When you're done, just use the template as a guide to write your draft for your non-fiction. Open up a new Scrivener document, and this time, choose the template you've created.
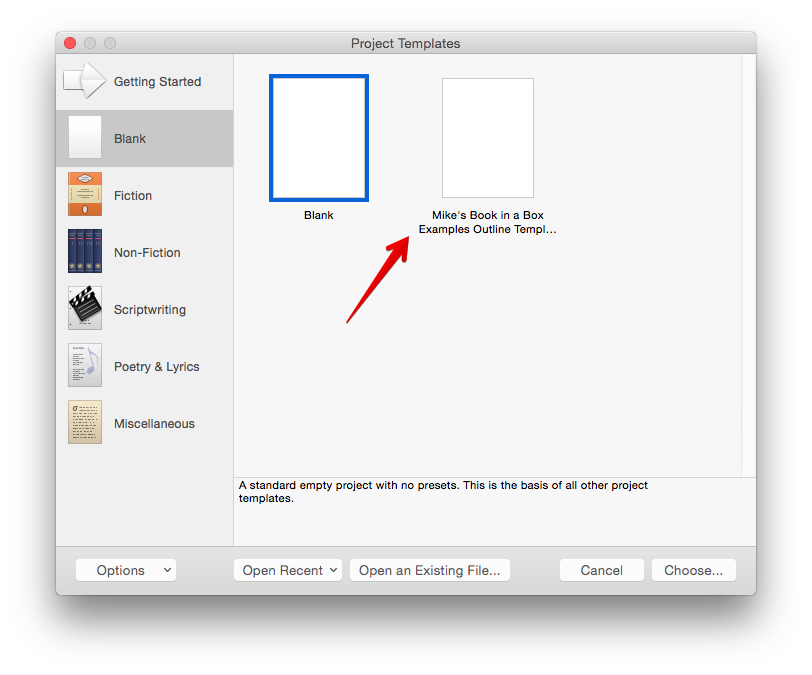
Start by filling in whatever initial info you need to. In mine, this is a “Crystallize Your Ideas” section that really comes before you start building the draft.
I made mine into a kind of question an answer format (like The Book in a Box Method), so that to begin, I would just start answering the questions in this section, before starting in on the rest of the draft. (I believe Sean Platt does the same thing when coming up with character traits in a fiction book–he just has a huge list of questions, and he picks and chooses questions from it to answer in order to dig into a given character.)
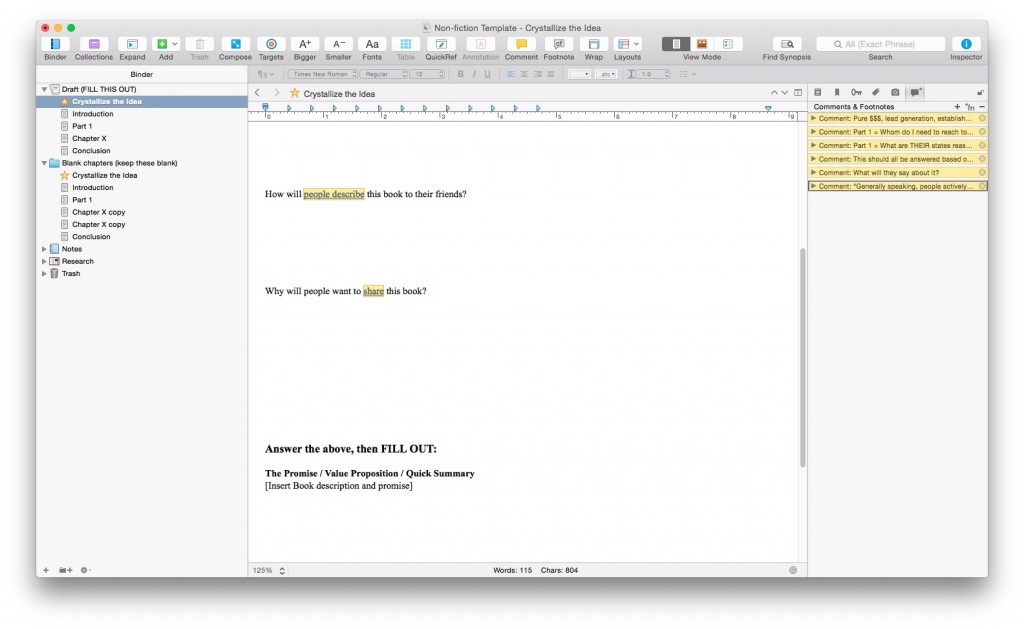 From there, you would probably want to fill in the draft from a more general bird's-eye view at first, copying and pasting more of those empty chapter files as you need them, filling in the sub-points, and maybe adding notes about pointed questions you need to answer when you're writing the draft.
Conclusion
I did this with the Book in a Box Method just as an example, but you could do this with just about any book on outlining nonfiction.
I don't recommend creating multiple templates; I recommend starting with one, then modifying the single template as you go. Modify it as you write. Modify it as you read more books and get ideas, whether they be ideas on the structure itself, or ideas for examples.
For example, if a book starts with a really good hook/opening, add it to a comment in your template right near the beginning, so that when you're starting your own book and need a great hook, you have a list of great hooks right there with your favourite examples, to jot your memory.
In other words, let the template evolve organically. This just means opening up the blank template, adding the change, then saving it as a new template, and deleting the old one. I'm not sure if it's possible to just save a change to a template without doing this. All you do to delete an old one is go File > New Project, navigate to the template you want to delete, then in the bottom left Options menu choose “Delete Selected Template.”
Of course, as your template evolves, you may want to keep the various versions of it. For example, you might find you branch off a single generic template to create two new templates that will produce two very different kinds of non-fiction books. In cases like this, just be intelligent with how you name them.
Other times, you might find the notes for one book are good to keep for reference for all future non-fiction. Great! One of the neat things about Scrivener is that you can drag and drop the files in the Binder section across windows, so that you can drag a bunch of files from one Scrivener doc into another.
Again, the template evolves organically. You can shove in there whatever you need to–as long as it's somewhere, and it's visible when you need it to be visible: when you're outlining a future book.
